I won't be upset if you didn't notice, but we've taken a bit of an extended break from both our blog and our work on the Villa. Sure, it's been a busy few months with the holidays, a hectic work schedule, and other general life things...but the main reason we haven't been around much anymore is that - after painting the lovely thing twice - we're no longer decorating a blue office. We're working on a blue...
...NURSERY! (Here's where I would post some adorable ultrasound pictures or a side view of my growing belly...but I have neither available and I'm leaving that up to your imagination.)
After finally coming out of my first-trimester hibernation (seriously, I didn't know it was possible to sleep in one position on the couch for three straight months), we're ready to get cracking again. And even though I haven't written much about it, we actually HAVE accomplished a thing or two over the past couple of months - like consulting with a designer to get some "big picture" ideas and getting estimates on the flooring. Little things without any fun corresponding pictures, but still things.
The good news is that the paint and supplies that I prepped for the next project (you know, before Thanksgiving when I innocently thought we'd be taking about a week off...) is all sitting exactly where I left it back before I fell asleep and took three months to wake up. And I've learned that I'll need to ditch my "do everything in one night" mentality to set small goals for ourselves. For example, this week I'll be completely thrilled if I make it over there once to make sure I have all the painting supplies we need so that we can jump right in this weekend.
So - no need to send out the search party. We're right here and we're still working away as fast as we can. Except now we're working what we imagine will be a very sweet and cuddly little deadline who will sleep through the night by...six weeks? (Ha ha)
(By the way, if you're wondering about the blue nursery, we have no idea if our little bambino is a girl or boy and we don't plan to find out before the birthday. However, I've found plenty of examples of baby girl nurseries with blue walls. We've already painted it twice - we're making it work!)
Monday, March 5, 2012
Tuesday, November 22, 2011
Sooooooo much better!!!!
Work hours since last post: 13. Pretty piddly, no?!? But...that's exactly what it takes for two people to get two layers of paint on a room (with lots of door and window frames, small corners, and NO paint tape!)...since that's pretty much all that we've accomplished this week.
We are slowly getting back to work and decided to start with our office re-do. Although we were 100% on board with repainting, I think our crazy blue blunder had us a little paralyzed in our decision-making abilities. After sleeping with the paint wheel under my pillow for a week (for inspiration) and a few hours in Anderson Paints, (talking to the salesman who thought we were insanely indecisive...but who was very helpful and even eliminated some choices from our stack for "personal taste." His personal taste. Not ours. But, hey, we were just happy to have less to choose from) we came back to the surface with Benjamin Moore Silvery Blue. Just like the name implies, it's definitely blue but has strong gray-ish undertones, which makes a perfect combination on four walls in a small room.
It's just what we were looking for and is so incredibly better. It's actually a bit more blue in person, but this is an idea of what we landed on.


We completely (maybe?) learned our lesson on this one. A color might be a pretty color on a 1x1 inch square of paper...or even on a 2x2 foot wall patch, but a "pure" color - any one in the spectrum - is pretty out of control when it's on all four walls of a room. We were initially super worried that our new choice would look gray and dull, but once the crazy old blue was completely covered...this blue is just right. We've learned not to fear the gray.
Funny story to prove our point. I discovered how helpful it is to google (shout out to my brother) prospective paint colors and see what it looks like in some room examples. I checked out Silvery Blue and ended up at this site discussing how to pick a blue room color. Low and behold...they are directly comparing our first and second attempts at a blue room. (They actually name Highland Breeze in the article, but we picked the color shown right above it - Morning Glory.) They're right on with their analysis - blue-blue could absolutely be considered "vibrating" while our gray-blue is soothing and peaceful.
So, now that you've seen how great it looks in the room (at least we think so!), here's a side-by-side comparison. I included a shot of our hallway in the last post, and it really highlighted the "glow" we had at night. Here are both hallway shots - before and after. Also called crazy-makes-me-twitch-a-little meets just right...
Before:

After:

Since I am now so grateful to sites that named walls colors for others to search, here's my quick shout-out: Benjamin Moore Silvery Blue....calm and beautiful. Benjamin Moore Morning Glory...I'm sure it has its place, but be careful!!!
Another short break for Thanksgiving - then we're on to the hallway and master bedroom so we can get the flooring started soon!
Tuesday, November 8, 2011
A Virtual To-Do List
Hours since last post: Who knows?!? We got too busy to keep count....
BUT...since the last post we successfully housed 11 people for the weekend (with another 5 of us staying at the condo), which means that it was cleaned, organized, tool-free, and fully functional for at least 3 days. And then we took, oh, a week and half off. So now we're looking ahead to the next goal. (I don't do well without goals and endpoints. Reality TV is just too tempting.)
By the end of last Christmas, we had a wedding date set and I figured that it would be the last time I decorated my condo for the holidays. I took a trillion pictures of my decorations, teared up a little (lot) when the last ornament was taken down, and said a bittersweet little farewell to the last of five Christmas seasons in my bachelorette pad. This is not to be repeated!! Hence our new goal...be finished with enough of the work upstairs to semi-move in and celebrate the season in our new/old home.
(On a side not, this is quite similar to the situation we stumbled upon a few weeks ago, when we realized that all of our fall/winter clothes had been taken over the Villa with the expectation that we'd be moved in by the time we would need them. Aren't we just the cutest little over-optimists?!? Sigh, back to the Beach House they all went...)
To accomplish this lofty goal, here's what we need to do (yes, this list is much more for ourselves than for anyone who might be reading this...):
1. Master bedroom


- REPAINT!!! We were pretty disappointed with the "wait, what color is this?" boring room. Back to the drawing boards, but now with a much better idea of what we want.
- Replace the vanity and sink in the dressing area. I'm pretty excited about my idea for this area, but it's going to take a little bit of antiquing and perhaps some craigslist-ing.
- Paint the dressing area and closet.
2. Yellow "project room"


- The most finished room...just paint and replace the grate for the heat duct.
3. Blue "office"

- The verdict is in....repaint. We tried. We really, really did. Sometimes I love it and sometimes I absolutely hate it. Even my eternally optimistic husband broke down and hinted that maybe we should consider another color for the room...and I knew by the speed of my return to www.benjaminmoore.com to scour for new colors that this room just wasn't meant to stay. (See #5 to see the color in it's glowing glory. I think I'd love it if it actually did look like the above picture.)
4. Bathroom

She's looking good, but there are still many things to do, including:
- Refinish the door
- Paint and replace the baseboards
- Replace knobs on vanity
- Replace sink
- Replace hardware in tub
- Cut, replace, and paint trim
- Fix minor leak in toilet (it runs on and off)
- Install towel hangers for bath and hand towels
5. Hallway

- Paint. The color is already selected (the master bedroom reject color, which is lovely for a hallway neutral). The tricky part will just be the stairway. I may have told Jeff that I'd rather not be around to watch while he climbs up on his ladder contraption to paint the high ceilings. His response..."Well, would you rather hear me scream on the way down and get help or find me hours later on the floor after I don't come home?" Yeah, I'll be there with 9-1 already dialed on the phone. (Mom, I'm totally kidding - we'll be completely safe.)
- By the way...from this perspective you can see how much our blue "glows" in darker lighting. Yep. Gotta go.
6. All over
- Floors - may the battle of carpet vs. hardwood begin!
- Freshen up the light fixtures
- New blinds
- Refinish all the doors one by one (including plugging the dead bolt holes from way back in the rental-room days)
See, not much to do at all! (Ahhh!!!!) We'll totally be moved in by Christmas...
Monday, October 17, 2011
If You Want to Make an Omelet...
...you'll have to scramble a few eggs. (Words of wisdom by Papa Salz.) And man alive, this place sure is scrambled right now!!!
I realized this weekend how long it's been since our last post, but it certainly isn't for lack of work or progress. Here's a little update on where we've been in the last three weeks...
Work time since last post: 95 hours, 50 minutes, plus shopping (WOW...thanks to some awesome late nights and full days spent with tile...)
HUGE check in the box - the tile floor in the bathroom is this close to being done! She needs a coat of sealer this week, but she's awesome. And she's taken a lot longer to get done than we anticipated. The process (which was educational and very painful to the knees) went a little bit like this:
1. We were (thankfully) convinced by a flooring dude at Lowe's that we should not attempt to remove the old linoleum floor, partly because it would take forever, be messy, and involve removing a whole lot of dried glue...but mostly because it is not advised to disrupt old linoleum glue that may or may not been applied prior to 1970 due to potentially harmful substances in the glue. We really think this floor was installed long after that date, but we wanted to play it safe, and now any potential harm is sealed under a quite a few new layers of material. Once that decision was out of the way, we had to cover the linoleum with a layer of thin set...

2. And then some backer board to give it a nice flat surface for the tiles. The difficult parts of this involved cutting the circles in the cement board for the toilet and water lines....and then putting in the d#*$ screws, which just wouldn't lie flat until they were drilled in, removed, cleaned out, drilled in again (and sometimes the process was repeated). We've since learned that there is a handy tool for this, but hardware stores were long closed by *ahem* 3am when we started this stage of the process.

3. After a practice run to confirm placement and plenty of measuring, chalk lining, remeasuring, and check with the level-ing, we were ready to tile. Our brother-in-law, Chuck, was generous enough to come out to help us with this step. Jeff's sister, Cheryl, and their three kids came along too and were excellent helpers after their trip to the apple orchard. Anika rocked out by cutting tiles of the mesh, Benjamin was a master mesh-remover, and Micah provided insight into our misuse of the term "diamond" for the smaller tile pieces. ("Guys, those are squares!!!" Smart little guy.)


4. The next day we put on the finishing touches and left it to set for a few days. This Saturday we made an awesome tag team with the grout - Jeff placed the grout as I sponged out the extra (saying "Oh my gosh, this looks awesome!!!" every few minutes).

5. Once we gave it a final cleaning the next day...

Isn't she beautiful?!?! We were pretty sad to realize that between the toilet, vanity, a little throw rug or a bathmat for the shower...not a whole lot of this work of art will actually be showing. But I've been enjoying sitting on the edge of the bathtub and checking out the scenery for now. I'm pretty darn proud of this one. Is it perfect? No....but it's ours.
But that's not all we've been up to! Oh no!!! We finished cleaning out the master bedroom, whose contents now all reside right here in the blue room. (OH! And update on the paint colors...they have grown on me BIG TIME and I can't wait to see the rooms in their final state. I'm so glad that Jeff, the thoughtful one, encouraged me, the rash fix-it-now one, to chill out and live with them for a while. He's a smart guy, too!)

The master is all primed, and...7 paint samples later...we picked our color for the room. With all the brighter colors going on in the other rooms, we picked a nice, peaceful, brown/tan/beige for this room. I can't wait to liven it up with some red decor from our wedding gifts - and maybe a few other colors, too. Turquoise? Yellow?
And...did you notice the relative absence of green tape in this room? That's right, I worked up the patience to give sans-tape painting a try, and it went fairly well. The picture rail was driving me bonkers, so that got a little tape around the bottom edge, but the hours and hours of painting are paying off with a steady hand. I'm so excited to not peel tape after this room is done.
We've finally started working on a few of the details, like changing out the light switches and electrical outlets. They're all a little sad and painted over a million times, so it's really about time. How much prettier is this one in the bathroom? It even needed a little re-ordering of the switches for optimal positioning, which we safely accomlished. (I must have asked "Are you sure the power is off?" about a million times, but better safe than sorry!)

As for the carpet, we were fairly set on what we wanted (at least narrowed down to two options...did you know they can make carpet out of corn now? Very Ann Arbor), and we wanted to hurry up and get it in before the family comes in a couple of weeks. But that would have been a huge rush for a pretty expensive purchase...and that was also before I peeled back the carpet in the master bedroom to reveal some beautiful (but covered in carpet glue and definitely needing some love) hardwoods. The whole upstairs has them, and now I'm on the "if we're going to spend the money, let's get these hardwoods out in the open" boat. We'll have a pro come check it out when the painting is done and take a little more time/budgeting for that decision later.
There's still plenty left to do upstairs, and we have T minus 10 days to get quite a bit of it done. Even after we've cleaned up for the day, the hallways still looks a little bit like this:

It's amazing to see some real progress on the major tasks, though...so we'll just keep on scrambling and hope for an omelet soon!!
I realized this weekend how long it's been since our last post, but it certainly isn't for lack of work or progress. Here's a little update on where we've been in the last three weeks...
Work time since last post: 95 hours, 50 minutes, plus shopping (WOW...thanks to some awesome late nights and full days spent with tile...)
HUGE check in the box - the tile floor in the bathroom is this close to being done! She needs a coat of sealer this week, but she's awesome. And she's taken a lot longer to get done than we anticipated. The process (which was educational and very painful to the knees) went a little bit like this:
1. We were (thankfully) convinced by a flooring dude at Lowe's that we should not attempt to remove the old linoleum floor, partly because it would take forever, be messy, and involve removing a whole lot of dried glue...but mostly because it is not advised to disrupt old linoleum glue that may or may not been applied prior to 1970 due to potentially harmful substances in the glue. We really think this floor was installed long after that date, but we wanted to play it safe, and now any potential harm is sealed under a quite a few new layers of material. Once that decision was out of the way, we had to cover the linoleum with a layer of thin set...
2. And then some backer board to give it a nice flat surface for the tiles. The difficult parts of this involved cutting the circles in the cement board for the toilet and water lines....and then putting in the d#*$ screws, which just wouldn't lie flat until they were drilled in, removed, cleaned out, drilled in again (and sometimes the process was repeated). We've since learned that there is a handy tool for this, but hardware stores were long closed by *ahem* 3am when we started this stage of the process.
3. After a practice run to confirm placement and plenty of measuring, chalk lining, remeasuring, and check with the level-ing, we were ready to tile. Our brother-in-law, Chuck, was generous enough to come out to help us with this step. Jeff's sister, Cheryl, and their three kids came along too and were excellent helpers after their trip to the apple orchard. Anika rocked out by cutting tiles of the mesh, Benjamin was a master mesh-remover, and Micah provided insight into our misuse of the term "diamond" for the smaller tile pieces. ("Guys, those are squares!!!" Smart little guy.)
4. The next day we put on the finishing touches and left it to set for a few days. This Saturday we made an awesome tag team with the grout - Jeff placed the grout as I sponged out the extra (saying "Oh my gosh, this looks awesome!!!" every few minutes).
5. Once we gave it a final cleaning the next day...
Isn't she beautiful?!?! We were pretty sad to realize that between the toilet, vanity, a little throw rug or a bathmat for the shower...not a whole lot of this work of art will actually be showing. But I've been enjoying sitting on the edge of the bathtub and checking out the scenery for now. I'm pretty darn proud of this one. Is it perfect? No....but it's ours.
But that's not all we've been up to! Oh no!!! We finished cleaning out the master bedroom, whose contents now all reside right here in the blue room. (OH! And update on the paint colors...they have grown on me BIG TIME and I can't wait to see the rooms in their final state. I'm so glad that Jeff, the thoughtful one, encouraged me, the rash fix-it-now one, to chill out and live with them for a while. He's a smart guy, too!)
The master is all primed, and...7 paint samples later...we picked our color for the room. With all the brighter colors going on in the other rooms, we picked a nice, peaceful, brown/tan/beige for this room. I can't wait to liven it up with some red decor from our wedding gifts - and maybe a few other colors, too. Turquoise? Yellow?
And...did you notice the relative absence of green tape in this room? That's right, I worked up the patience to give sans-tape painting a try, and it went fairly well. The picture rail was driving me bonkers, so that got a little tape around the bottom edge, but the hours and hours of painting are paying off with a steady hand. I'm so excited to not peel tape after this room is done.
We've finally started working on a few of the details, like changing out the light switches and electrical outlets. They're all a little sad and painted over a million times, so it's really about time. How much prettier is this one in the bathroom? It even needed a little re-ordering of the switches for optimal positioning, which we safely accomlished. (I must have asked "Are you sure the power is off?" about a million times, but better safe than sorry!)
As for the carpet, we were fairly set on what we wanted (at least narrowed down to two options...did you know they can make carpet out of corn now? Very Ann Arbor), and we wanted to hurry up and get it in before the family comes in a couple of weeks. But that would have been a huge rush for a pretty expensive purchase...and that was also before I peeled back the carpet in the master bedroom to reveal some beautiful (but covered in carpet glue and definitely needing some love) hardwoods. The whole upstairs has them, and now I'm on the "if we're going to spend the money, let's get these hardwoods out in the open" boat. We'll have a pro come check it out when the painting is done and take a little more time/budgeting for that decision later.
There's still plenty left to do upstairs, and we have T minus 10 days to get quite a bit of it done. Even after we've cleaned up for the day, the hallways still looks a little bit like this:
It's amazing to see some real progress on the major tasks, though...so we'll just keep on scrambling and hope for an omelet soon!!
Tuesday, September 27, 2011
Two Down and Two To Go

Work hours on site since last post: 37 hours, 25 minutes (plus lots of shopping!!)
We're finally feeling like we're making some really good progress here at the Villa...two upstairs rooms are done and just two left to go!
Here's a quick run-down of how we spent our last 37.5 work hours...
First off, the office was painted a lovely blue color (hence the second room complete!). In all honestly, however, I can only refer to it as "lovely" during the day. Somehow at night, the place starts to glow. We were extremely close to jumping ship after the first coat and going for something lighter, but we decided to stand by our choice, see what it looks like with new carpet, wall hangings, and furniture...and maybe repaint in a few months when we (meaning I) still cringe when I walk down the hallway at night.
Here's a little sneak peak of the room (imagine much lighter carpet and pictures on the wall...)

Why just a sneak peak? Our projects have a window of approximately 3.5 minutes for us to stand back and say, "Wow, looks great!" before they are briskly pushed aside to make way for the next project. I forgot to bring my camera the day that we completed the walls, and that 3.5 minute window was lost. The room became storage for the next big project before there was even hope of a good picture.
And what are we storing in there? Everything from the master bedroom! That big move has accounted for most of Jeff's work hours since we finished painting. Organizing and cleaning 10+ years of life from the master bedroom is not a quick or easy task. I know that my turn for organizing and purging is coming soon...so no further comments from me.
The bathroom! We finally turned a corner in the bathroom, and all of the wall/ceiling repairs are 100% complete! It's been primed (again, twice...sheesh), colors for the ceiling and wall are selected (see top picture for my paint selection process), and this week's project is to finish those walls! Some quick before and after shots...
BEFORE - peeling paint, mildew stains, and ripped walls where anything was removed...


AFTER - no paint peels, no stains, and smooth walls and ceiling!!


Now this I will call absolutely lovely. Soooo many hours were spent in here, and seeing the smooth walls is about as lovely as it gets in my home renovation book. It's absolutely still a work in progress with plenty left to do...but it's fantastic to be in the "rebuilding" phase rather than the "repairing" phase. We've even purchased many of the new fixtures. And yes, I'm more than ready to reinstall the toilet and be done with the basement "throne"...
Friday, September 16, 2011
Slow and Steady
Good thing we're not actually racing anyone...the professionals probably could have built four entire houses by now...
I've been holding off on posting anything because we are still completely lacking any cool before and after shots to share. BUT!
Man hours since last post: 29 hours, 50 minutes. Considering how busy our lives have been in the past two weeks, I'm pretty impressed with that number. And just to highlight a few things that we've been working on...
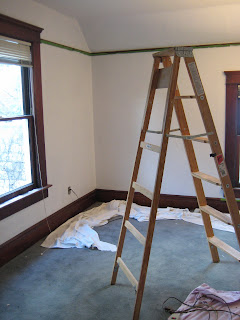
 Here's this weekend's big project! The plaster repairs in the office are finally complete, the whole room has been primed twice (thanks to some awesome dark green paint), the new color has been selected (much easier process than either of us thought!), and 2 gallons of paint are patiently waiting to be rollered on the walls.
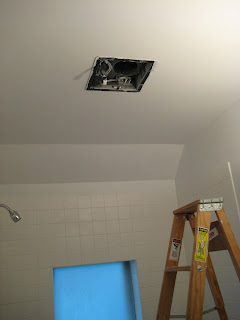
 The bathroom ceiling is DONE!!!! Of these past 29 man hours, we've probably spent a good 10 or so up on a ladder lovingly fixing this baby. You might recall that the before pictures show some pretty bad peeling of paint, and changing out the exhaust fan left a gaping hole into the attic. Jeff has picked up some drywall installation skills, and I've been smoothing out all the bumps and bruises with many evenings of sanding and skim-coating. You can see that the walls needed a little bit of help as well, so you can tack on another few good hours for those. (I apologize for the horrible lighting...in my awesomeness, I accidentally rendered the wall light fixture totally useless. Which was in the plans eventually...but didn't make for good work lighting. Oops.)
 We're not quite ready to paint this room, as we still have a few areas like this to deal with. Last weekend we removed the last of the fixtures from the wall and are touching things up before we paint. We probably could have used the existing nails for our new hardware, but we decided to start with a clean slate this time around. The baseboard has also been removed since we'll be raising the floor up a bit with some new floorboard and the tile. Much to our surprise, the baseboard was GLUED on. Yes. Glued. Which means...more repair work where the glue tore little pieces off the wall. Come on people, glue?!? A few finishing touches this weekend and we'll hopefully be able to prime the bathroom next week.
But now...the most exciting update since our last post...
 We've starting shopping for all things NEW! Here's just a little sneak peak of our front-runner in tile for the bathroom floor. I was originally dead set on some shiny pretty marble tile, but after looking around a bit we both realized that this bathroom needs something with a bit of "older" character to fit with the rest of the house. What you can't tell about this choice from the picture is that there's a slight (but just enough) contrast in color and texture between the big and small tiles to make a really nice but still pretty neutral statement - and we still have a few other options in the mix. We're taking a tile class tomorrow morning, and then it's decision time.
Exciting things, which is good because our first real deadline is staring us down! We've enjoyed being able to do things at our own pace without being stressed about time, but we MUST have the upstairs finished (and by finished we mean clean and live-able) by October 28th. We think this is pretty realistic goal, and it's actually really good for us to have a purpose to push forward.
Happy Friday. If you need us this weekend, you know where we'll be...paintbrushes in hand!
I've been holding off on posting anything because we are still completely lacking any cool before and after shots to share. BUT!
Man hours since last post: 29 hours, 50 minutes. Considering how busy our lives have been in the past two weeks, I'm pretty impressed with that number. And just to highlight a few things that we've been working on...
But now...the most exciting update since our last post...
Exciting things, which is good because our first real deadline is staring us down! We've enjoyed being able to do things at our own pace without being stressed about time, but we MUST have the upstairs finished (and by finished we mean clean and live-able) by October 28th. We think this is pretty realistic goal, and it's actually really good for us to have a purpose to push forward.
Happy Friday. If you need us this weekend, you know where we'll be...paintbrushes in hand!
Wednesday, August 31, 2011
Please Excuse Our Dust
UPDATE:
Work time since last post: 9 hours, 45 minutes
Accomplishments: Office plaster repairs are primed and the whole room is ready to paint. I've re-plastered the bathroom ceiling and damaged wall areas with two coats of joint compound; also sanded in between and after the final layer.
Fancy before and after shots to share: NONE
Sigh...I'll just keep on plastering and sanding...
However, I'm thrilled to share this little gem of a self-portrait that I took last night after I finished sanding Layer Two of plaster.

Forget an 80's come-back...this is how we bring sexy back, baby!! My little portrait actually does give a sneak peak at some of our progress. See the ceiling above my lovely head? It used to look like this:
Improvement, no?!?
(And my technical side note...that respirator is really pretty awesome. It may look, uh, ridiculous, and feel really hot and sticky under there, but the feeling of plaster dust coating your teeth is NOT cool. My lungs are much happier because of this little purchase. And Jeff has one too, so we can totally be a super cute couple in our matching respirators.)
Subscribe to:
Posts (Atom)